GlusterFS Documentation
Introduction[edit | edit source]
GlusterFS is an open source, distributed file system capable of scaling to several petabytes (actually, 72 brontobytes!) and handling thousands of clients. GlusterFS clusters together storage building blocks over Infiniband RDMA or TCP/IP interconnect, aggregating disk and memory resources and managing data in a single global namespace. It is based on a stackable user space design and can deliver exceptional performance for diverse workloads.But most existing cluster file systems are not mature enough for the enterprise market. They are too complex to deploy and maintain, although they are extremely scalable and cheap since they can be entirely built out of commodity OS and hardware.GlusterFS solves this problem. GlusterFS is an easy to use clustered file system that meets enterprise-level requirements.
No longer are users locked into costly, monolithic, legacy storage platforms. GlusterFS gives users the ability to deploy scale-out, virtualized storage – scaling from terabytes to petabytes in a centrally managed and commoditized pool of storage,which is available to user(s) in a single mount point, making it simple for the user. It is written in user space which uses FUSE(File system in user space) to hook itself with VFS layer.It takes a layered approach to the file system, where features are added/removed as per the requirement. Though GlusterFS is a File System, it uses already tried and tested disk file systems like ext3, ext4, xfs, etc. to store the data.
Features and advantages of GlusterFS
- GlusterFS can be deployed with the help of commodity hardware servers.
- No metadata server.
- N number of servers can access a storage that can be scaled upto several petabytes.
- Linear scaling and performance
- Aggregates on top of existing filesystems. User can recover the files and folders even without GlusterFS.
- GlusterFS has no single point of failure. Completely distributed. No centralized meta-data server like Lustre.
- Extensible scheduling interface with modules loaded based on user's storage I/O access pattern.
- Modular and extensible through powerful translator mechanism.
- Supports Infiniband RDMA and TCP/IP.
- Entirely implemented in user-space. Easy to port, debug and maintain.
Terminologies[edit | edit source]
- Access Control Lists: Access Control Lists (ACLs) allows you to assign different permissions for different users or groups even though they do not correspond to the original owner or the owning group.
- Brick: Brick is the basic unit of storage, represented by an export directory on a server in the trusted storage pool.
- Client: The machine which mounts the volume (this may also be a server).
- Cluster: A cluster is a group of linked computers, working together closely thus in many respects forming a single computer.
- Distributed File System: A file system that allows multiple clients to concurrently access data over a computer network
- FUSE: Filesystem in Userspace (FUSE) is a loadable kernel module for Unix-like computer operating systems that lets non-privileged users create their own file systems without editing kernel code. This is achieved by running file system code in user space while the FUSE module provides only a "bridge" to the actual kernel interfaces.
- glusterd: Gluster management daemon that needs to run on all servers in the trusted storage pool.
- Geo-Replication: Geo-replication provides a continuous, asynchronous, and incremental replication service from site to another over Local Area Networks (LANs), Wide Area Network (WANs), and across the Internet.
- Metadata: Metadata is defined as data providing information about one or more other pieces of data.There is no special metadata storage concept in GlusterFS. The metadata is stored with the file data itself.
- Namespace: Namespace is an abstract container or environment created to hold a logical grouping of unique identifiers or symbols. Each Gluster volume exposes a single namespace as a POSIX mount point that contains every file in the cluster.
- POSIX: Portable Operating System Interface [for Unix] is the name of a family of related standards specified by the IEEE to define the application programming interface (API), along with shell and utilities interfaces for software compatible with variants of the Unix operating system. Gluster exports a fully POSIX compliant file system.
- RAID: Redundant Array of Inexpensive Disks”, is a technology that provides increased storage reliability through redundancy, combining multiple low-cost, less-reliable disk drives components into a logical unit where all drives in the array are interdependent.
- Replicate: Replicate is generally done to make a redundancy of the storage for data availability.
- RRDNS: Round Robin Domain Name Service (RRDNS) is a method to distribute load across application servers. It is implemented by creating multiple A records with the same name and different IP addresses in the zone file of a DNS server.
- Server: The machine which hosts the actual file system in which the data will be stored.
- Trusted Storage Pool: A storage pool is a trusted network of storage servers. When you start the first server, the storage pool consists of that server alone.
- Userspace: Applications running in user space don’t directly interact with hardware, instead using the kernel to moderate access. Userspace applications are generally more portable than applications in kernel space. Gluster is a user space application.
- Volume: A volume is a logical collection of bricks. Most of the gluster management operations happen on the volume.
- Vol file: .vol files are configuration files used by glusterfs process. Volfiles will be usually located at /var/lib/glusterd/vols/volume-name/. Eg:vol-name-fuse.vol,export-brick-name.vol,etc. Sub-volumes in the .vol files are present in the bottom-up approach and then after tracing forms a tree structure, where in the hierarchy last comes the client volumes.
- FOPS:The fops table, defined in xlator.h, is one of the most important pieces. This table contains a pointer to each of the filesystem functions that your translator might implement – open, read, stat, chmod, and so on.
- NUFA:The NUFA ("Non Uniform File Access") is a variant of the DHT ("Distributed Hash Table") translator, intended for use with workloads that have a high locality of reference.
- xattr(GlusterFS Extended attributes):The act of getting or setting xattrs on a file can trigger any kind of action at the server where it lives, with the potential to pass information both in (via setxattr) and out (via getxattr). That amounts to a form of RPC which components at any level in the system can use without requiring special support from any of the other components in between, and this trick is used extensively throughout GlusterFS.
Architecture[edit | edit source]
Types of Volumes[edit | edit source]
Volume is the collection of bricks and most of the gluster file system operations happen on the volume. Gluster file system supports different types of volumes based on the requirements. Some volumes are good for scaling storage size, some for improving performance and some for both.
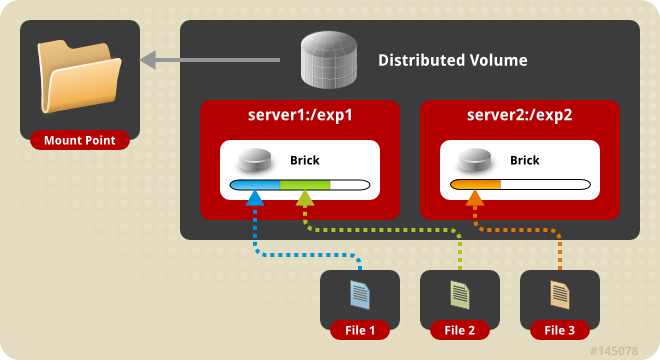
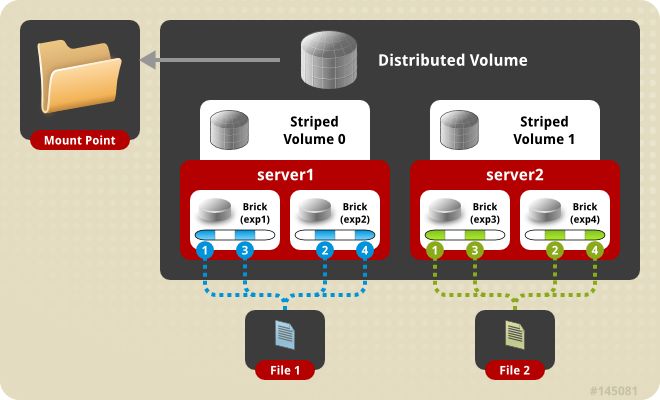
1. Distributed Glusterfs Volume - This is the default glusterfs volume i.e, while creating a volume of you do not specify the type of the volume the default option is to create a distributed type of volume. Here files are distributed across various bricks in the volume. So file1 may be stored only in brick1 or brick2 but not on both. Hence there is no data redundancy. The purpose for such a storage volume is to easily scale the volume size. However this also means that a brick failure will lead to complete loss of data and one must rely on the underlying hardware for data loss protection.
Create a Distributed Volume
gluster volume create NEW-VOLNAME [transport [tcp | rdma | tcp,rdma]] NEW-BRICK...
For example to create a distributed volume with four storage servers using TCP.
gluster volume create test-volume server1:/exp1 server2:/exp2 server3:/exp3 server4:/exp4
Creation of test-volume has been successful
Please start the volume to access data
To display the volume info
#gluster volume info
Volume Name: test-volume
Type: Distribute
Status: Created
Number of Bricks: 4
Transport-type: tcp
Bricks:
Brick1: server1:/exp1
Brick2: server2:/exp2
Brick3: server3:/exp3
Brick4: server4:/exp
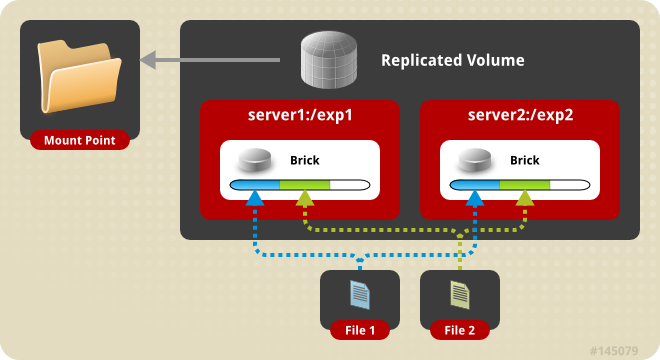
2. Replicated Glusterfs Volume - In this volume we overcome the data loss problem faced in the distributed volume. Here exact copy of the data is maintained on all bricks. The number of replicas in the volume can be decided by client while creating the volume. So we need to have at least two bricks to create a volume with 2 replicas or a minimum of three bricks to create a volume of 3 replicas. One major advantage of such a volume is that even if one brick fails the data can still be accessed from its replica brick. Such a volume is used for better reliability and data redundancy.
Create a Replicated Volume
gluster volume create NEW-VOLNAME [replica COUNT] [transport [tcp | rdma | tcp,rdma]] NEW-BRICK...
For example, to create a replicated volume with two storage servers:
# gluster volume create test-volume replica 2 transport tcp server1:/exp1 server2:/exp2
Creation of test-volume has been successful
Please start the volume to access data
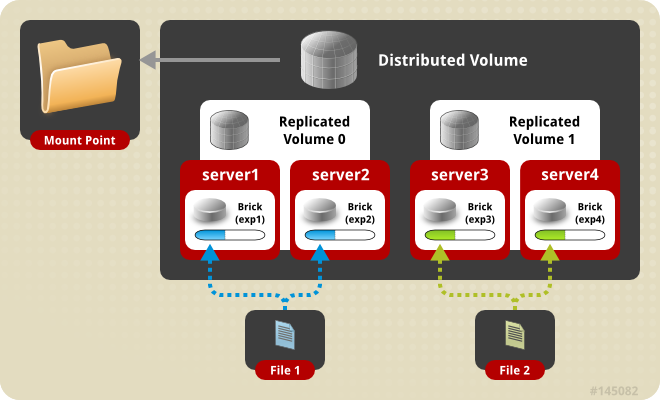
3. Distributed Replicated Glusterfs Volume - In this volume files are distributed across replicated sets of bricks. The number of bricks must be a multiple of the replica count. Also the order in which we specify the bricks matters since adjacent bricks become replicas of each other. This type of volume is used when high availability of data due to redundancy and scaling storage is required. So if there were eight bricks and replica count 2 then the first two bricks become replicas of each other then the next two and so on. This volume is denoted as 4x2. Similarly if there were eight bricks and replica count 4 then four bricks become replica of each other and we denote this volume as 2x4 volume.
Create the distributed replicated volume:
# gluster volume create NEW-VOLNAME [replica COUNT] [transport [tcp | rdma | tcp,rdma]] NEW-BRICK...
For example, four node distributed (replicated) volume with a two-way mirror:
# gluster volume create test-volume replica 2 transport tcp server1:/exp1 server2:/exp2 server3:/exp3 server4:/exp4
Creation of test-volume has been successful
Please start the volume to access data
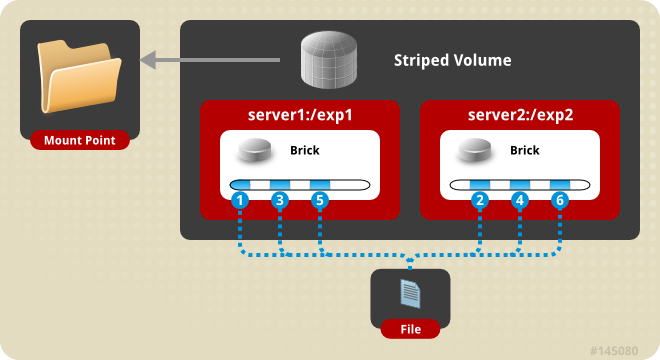
4. Striped Glusterfs Volume - Consider a large file being stored in a brick which is frequently accessed by many clients at the same time. This will cause too much load on a single brick and would reduce the performance. In striped volume the data is stored in the bricks after dividing it into different stripes. So the large file will be divided into smaller chunks (equal to the number of bricks in the volume) and each chunk is stored in a brick. Now the load is distributed and the file can be fetched faster but no data redundancy provided.
Create a Striped Volume
gluster volume create NEW-VOLNAME [stripe COUNT] [transport [tcp | dma | tcp,rdma]] NEW-BRICK...
For example, to create a striped volume across two storage servers:
# gluster volume create test-volume stripe 2 transport tcp server1:/exp1 server2:/exp2
Creation of test-volume has been successful
Please start the volume to access data
5. Distributed Striped Glusterfs Volume - This is similar to Striped Glusterfs volume except that the stripes can now be distributed across more number of bricks. However the number of bricks must be a multiple of the number of stripes. So if we want to increase volume size we must add bricks in the multiple of stripe count.
Create the distributed striped volume:
# gluster volume create NEW-VOLNAME [stripe COUNT] [transport [tcp | rdma | tcp,rdma]] NEW-BRICK...
For example, to create a distributed striped volume across eight storage servers:
# gluster volume create test-volume stripe 4 transport tcp
 server1:/exp1 server2:/exp2 server3:/exp3 server4:/exp4 server5:/exp5 server6:/exp6 server7:/exp7 server8:/exp8
Creation of test-volume has been successful
Please start the volume to access data.
FUSE[edit | edit source]
GlusterFS is a userspace filesystem. This was a decision made by the GlusterFS developers initially as getting the modules into linux kernel is a very long and difficult process.
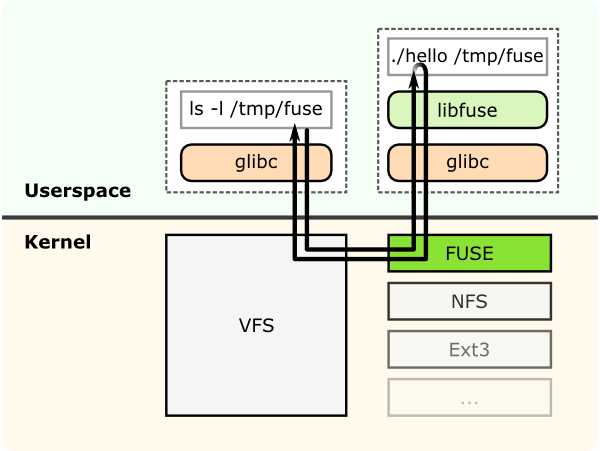
Being a userspace filesystem, to interact with kernel VFS, GlusterFS makes use of FUSE(File System in Userspace). For a long time, implementation of a userspace filesystem was considered impossible. FUSE was developed as a solution for this. FUSE is a kernel module that support interaction between kernel VFS and non-privileged user applications and it has an API that can be accessed from userspace. Using this API, any type of filesystem can be written using almost any language you prefer as there are many bindings between FUSE and other languages.
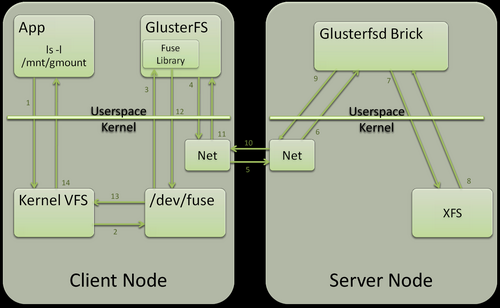
This shows a filesystem "hello world" that is compiled to create a binary "hello". It is executed with a filesystem mount point /tmp/fuse. Then the user issues a command ls -l on the mount point /tmp/fuse. This command reaches VFS via glibc and since the mount /tmp/fuse corresponds to a FUSE based filesystem, VFS passes it over to FUSE module. The FUSE kernel module contacts the actual filesystem binary "hello" after passing through glibc and FUSE library in userspace(libfuse). The result is returned by the "hello" through the same path and reaches the ls -l command.
The communication between FUSE kernel module and the FUSE library(libfuse) is via a special file descriptor which is obtained by opening /dev/fuse. This file can be opened multiple times, and the obtained file descriptor is passed to the mount syscall, to match up the descriptor with the mounted filesystem.
Translators[edit | edit source]
Translating “translators”:
- A translator converts requests from users into requests for storage.
*One to one, one to many, one to zero (e.g. caching)
- A translator can modify requests on the way through :
    *convert one request type to another ( during the request transfer amongst the translators)
    *modify paths, flags, even data (e.g. encryption)
- Translators can intercept or block the requests. (e.g. access control)
- Or spawn new requests (e.g. pre-fetch)
How Do Translators Work?
- Shared Objects
- Dynamically loaded according to 'volfile'
*dlopen/dlsync
*setup pointers to parents / children
*call init (constructor)
*call IO functions through fops.
- Conventions for validating/ passing options, etc.
- The configuration of translators (since GlusterFS 3.1) is managed through the gluster command line interface (cli), so you don't need to know in what order to graph the translators together.
Types of Translators[edit | edit source]
List of known translators with their current status.
| Translator Type | Functional Purpose |
|---|---|
| Storage | Lowest level translator, stores and accesses data from local file system. |
| Debug | Provide interface and statistics for errors and debugging. |
| Cluster | Handle distribution and replication of data as it relates to writing to and reading from bricks & nodes. |
| Encryption | Extension translators for on-the-fly encryption/decryption of stored data. |
| Protocol | Extension translators for on-the-fly encryption/decryption of stored data. |
| Performance | Tuning translators to adjust for workload and I/O profiles. |
| Bindings | Add extensibility, e.g. The Python interface written by Jeff Darcy to extend API interaction with GlusterFS. |
| System | System access translators, e.g. Interfacing with file system access control. |
| Scheduler | I/O schedulers that determine how to distribute new write operations across clustered systems. |
| Features | Add additional features such as Quotas, Filters, Locks, etc. |
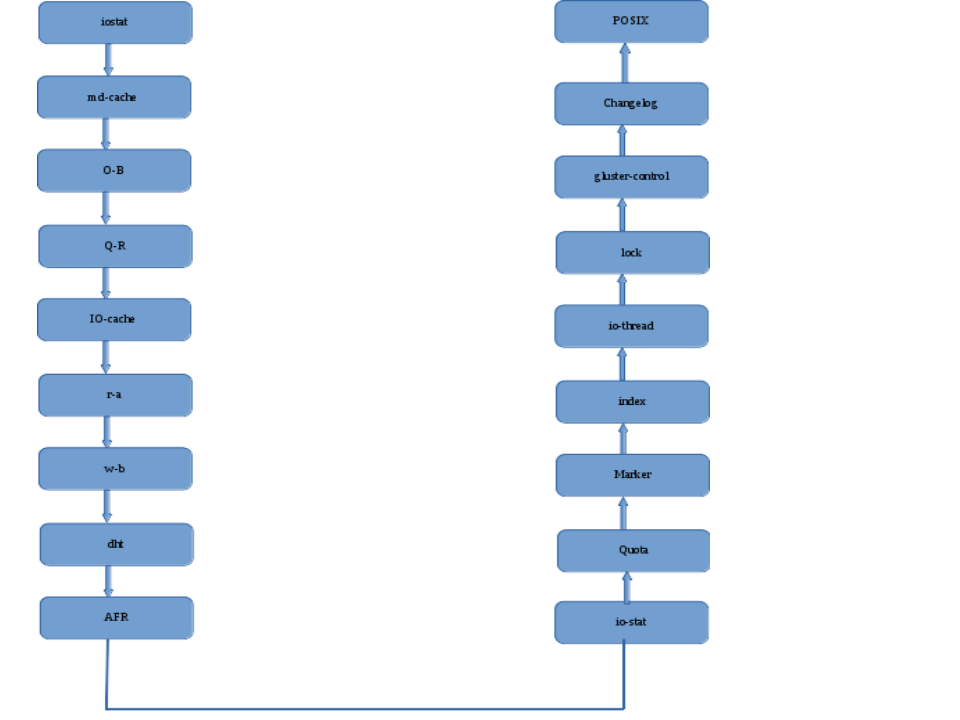
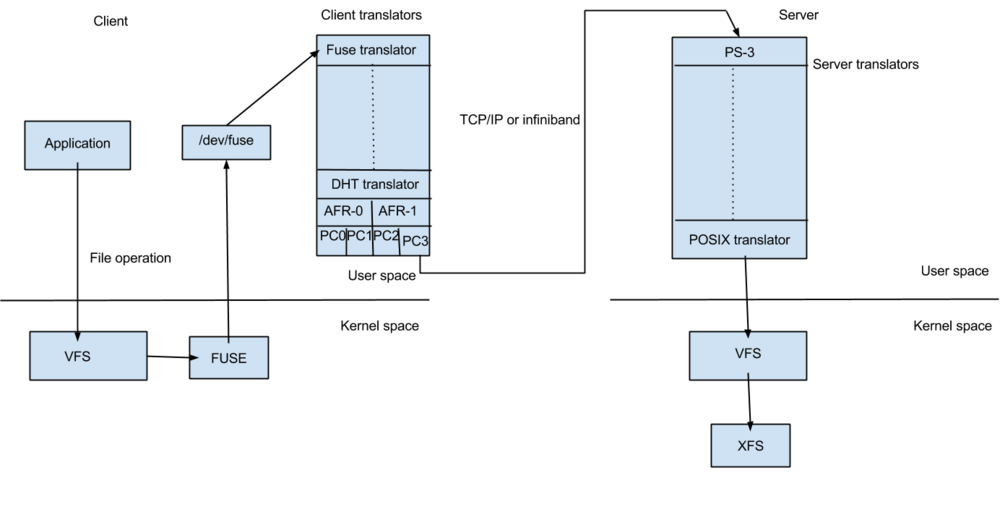
The default / general hierarchy of translators in vol files :
All the translators hooked together to perform a function is called a graph. The left-set of translators comprises of Client-stack.The right-set of translators comprises of Server-stack.
The glusterfs translators can be sub-divided into many categories, but two important categories are - Cluster and Performance translators :
One of the most important and the first translator the data/request has to go through is fuse translator which falls under the category of Mount Translators.
- Cluster Translators:
   *DHT(Distributed Hash Table)
   *AFR(Automatic File Replication)
- Performance Translators:
   * io-cache
   * io-threads
   * md-cache
   * O-B (open behind)
   * QR (quick read)
   * r-a (read-ahead)
   * w-b (write-behind)
Other Feature Translators include:
   * changelog
   * locks - GlusterFS has locks  translator which provides the following internal locking operations called `inodelk`, `entrylk`,
     which are used by afr to achieve synchronization of operations on files or directories that conflict with each other.
   * marker
   * quota
Debug Translators
   * trace - To trace the error logs generated during the communication amongst the translators.
   * io-stats
DHT(Distributed Hash Table) Translator[edit | edit source]
What is DHT?
DHT is the real core of how GlusterFS aggregates capacity and performance across multiple servers. Its responsibility is to place each file on exactly one of its subvolumes – unlike either replication (which places copies on all of its subvolumes) or striping (which places pieces onto all of its subvolumes). It’s a routing function, not splitting or copying.
How DHT works?
The basic method used in DHT is consistent hashing. Each subvolume (brick) is assigned a range within a 32-bit hash space, covering the entire range with no holes or overlaps. Then each file is also assigned a value in that same space, by hashing its name. Exactly one brick will have an assigned range including the file’s hash value, and so the file “should” be on that brick. However, there are many cases where that won’t be the case, such as when the set of bricks (and therefore the range assignment of ranges) has changed since the file was created, or when a brick is nearly full. Much of the complexity in DHT involves these special cases, which we’ll discuss in a moment.
When you open() a file, the distribute translator is giving one piece of information to find your file, the file-name. To determine where that file is, the translator runs the file-name through a hashing algorithm in order to turn that file-name into a number.
//DHT DIAGRAM
Few Observations of DHT hash-values assignment:
- The assignment of hash ranges to bricks is determined by extended attributes stored on directories, hence distribution is directory-specific.
- Consistent hashing is usually thought of as hashing around a circle, but in GlusterFS it’s more linear. There’s no need to “wrap around” at zero, because there’s always a break (between one brick’s range and another’s) at zero.
- If a brick is missing, there will be a hole in the hash space. Even worse, if hash ranges are reassigned while a brick is offline, some of the new ranges might overlap with the (now out of date) range stored on that brick, creating a bit of confusion about where files should be.
AFR(Automatic File Replication) Translator[edit | edit source]
The Automatic File Replication (AFR) translator in glusterFS makes use of the extended attributes to keep track of the file operations.It is responsible for replicating the data across the bricks.
Responsibilities of AFR[edit | edit source]
Its responsibilities include the following:
- Maintain replication consistency (i.e. Data on both the bricks should be same, even in the cases where there are operations happening on same file/directory in parallel from multiple applications/mount points as long as all the bricks in replica set are up).
- Provide a way of recovering data in case of failures as long as there is at least one brick which has the correct data.
- Serve fresh data for read/stat/readdir etc..
Geo-Replication[edit | edit source]
Geo-replication provides asynchronous replication of data across geographically distinct locations and was introduced in Glusterfs 3.2. It mainly works across WAN and is used to replicate the entire volume unlike AFR which is intra-cluster replication. This is mainly useful for backup of entire data for disaster recovery.
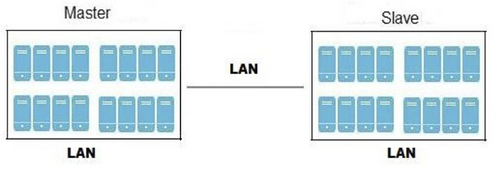
Geo-replication uses a master-slave model, whereby replication occurs between Master - a GlusterFS volume and Slave - which can be a local directory or a glusterFS volume. The slave (local directory or volume is accessed using SSH tunnel).
Geo-replication provides an incremental replication service over Local Area Networks (LANs), Wide Area Network (WANs), and across the Internet.
Geo-replication over LAN
You can configure Geo-replication to mirror data over a Local Area Network.
Geo-replication over WAN
You can configure Geo-replication to replicate data over a Wide Area Network.
Geo-replication over Internet
You can configure Geo-replication to mirror data over the Internet.
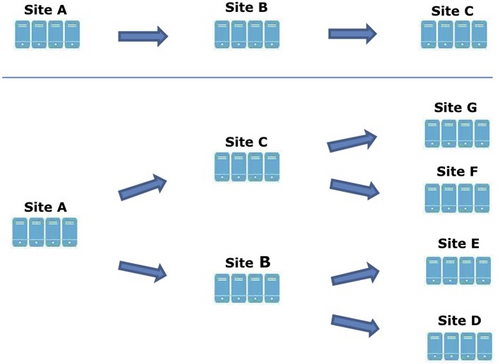
Multi-site cascading Geo-replication
You can configure Geo-replication to mirror data in a cascading fashion across multiple sites.
There are mainly two aspects while asynchronously replicating data:
1. Change detection - These include file-operation necessary details. There are two methods to sync the detected changes:
i) Changelogs - Changelog is a translator which records necessary details for the fops that occur. The changes can be written in binary format or ASCII. There are three category with each category represented by a specific changelog format. All three types of categories are recorded in a single changelog file.
Entry - create(), mkdir(), mknod(), symlink(), link(), rename(), unlink(), rmdir()
Data - write(), writev(), truncate(), ftruncate()
Meta - setattr(), fsetattr(), setxattr(), fsetxattr(), removexattr(), fremovexattr()
In order to record the type of operation and entity underwent, a type identifier is used. Normally, the entity on which the operation is performed would be identified by the pathname, but we choose to use GlusterFS internal file identifier (GFID) instead (as GlusterFS supports GFID based backend and the pathname field may not always be valid and other reasons which are out of scope of this this document). Therefore, the format of the record for the three types of operation can be summarized as follows:
Entry - GFID + FOP + MODE + UID + GID + PARGFID/BNAME [PARGFID/BNAME]
Meta - GFID of the file
Data - GFID of the file
GFID's are analogous to inodes. Data and Meta fops record the GFID of the entity on which the operation was performed, thereby recording that there was a data/metadata change on the inode. Entry fops record at the minimum a set of six or seven records (depending on the type of operation), that is sufficient to identify what type of operation the entity underwent. Normally this record includes the GFID of the entity, the type of file operation (which is an integer [an enumerated value which is used in Gluterfs]) and the parent GFID and the basename (analogous to parent inode and basename).
Changelog file is rolled over after a specific time interval. We then perform processing operations on the file like converting it to understandable/human readable format, keeping private copy of the changelog etc. The library then consumes these logs and serves application requests.
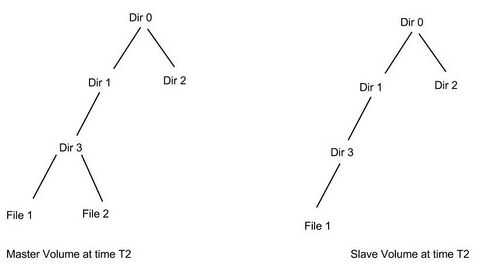
ii) Xsync - Marker translator maintains an extended attribute “xtime” for each file and directory. Whenever any update happens it would update the xtime attribute of that file and all its ancestors. So the change is propagated from the node (where the change has occurred) all the way to the root.
Consider the above directory tree structure. At time T1 the master and slave were in sync each other.
At time T2 a new file File2 was created. This will trigger the xtime marking (where xtime is the current timestamp) from File2 upto to the root, i.e, the xtime of File2, Dir3, Dir1 and finally Dir0 all will be updated.
Geo-replication daemon crawls the file system based on the condition that xtime(master) > xtime(slave). Hence in our example it would crawl only the left part of the directory structure since the right part of the directory structure still has equal timestamp. Although the crawling algorithm is fast we still need to crawl a good part of the directory structure.
2. Replication - We use rsync for data replication. Rsync is an external utility which will calculate the diff of the two files and sends this difference from source to sync.
Overall working of GlusterFS[edit | edit source]
Rough draft
As soon as GlusterFS is installed in a server node, a gluster management daemon(glusterd) binary will be created. This daemon should be running in all participating nodes in the cluster. After starting glusterd, a trusted server pool(TSP) can be created consisting of all storage server nodes(TSP can contain even a single node). Now bricks which are the basic units of storage can be created as export directories in these servers. Any number of bricks from this TSP can be clubbed together to form a volume.
Once a volume is created, a glusterfsd process starts running in each of the participating brick. Along with this, configuration files known as vol files will be generated inside /var/lib/glusterd/vols/. There will be configuration files corresponding to each brick in the volume. This will contain all the details about that particular brick. Configuration file required by a client process will also be created. Now our filesystem is ready to use. We can mount this volume on a client machine very easily as follows and use it like we use a local storage:
mount.glusterfs <IP or hostname>:<volume_name> <mount_point>
IP or hostname can be that of any node in the trusted server pool in which the required volume is created.
When we mount the volume in the client, the client glusterfs process communicates with the servers’ glusterd process. Server glusterd process sends a configuration file(vol file) containing the list of client translators and another containing the information of each brick in the volume with the help of which the client glusterfs process can now directly communicate with each brick’s glusterfsd process. The setup is now complete and the volume is now ready for client's service.
When a system call(File operation or Fop) is issued by client in the mounted filesystem, the VFS (identifying the type of filesystem to be glustefs) will send the request to the FUSE kernel module. The FUSE kernel module will in turn send it to the GlusterFS in the userspace of the client node via /dev/fuse (this has been descibed in FUSE section). The GlusterFS process in client consists of a stack of translators called the client translators which are defined in the configuration file(vol file) send by the storage server glusterd process. The first among these translators being the FUSE translator which consists of the FUSE library(libfuse). Each translator has got functions corresponding to each file operation or fop supported by glusterfs. The request will hit the corresponding function in each of the translator. Main client translators include:
- FUSE translator
- DHT translator- DHT translator maps the request to the correct brick that contains the file or directory required.
- AFR translator- It receives the request from the previous translator and if the volume type is replicate, it duplicates the request and pass it on to the Protocol client translators of the replicas.
- Protocol Client translator- Protocol Client translator is the last in the client translator stack. This translator is divided into multiple threads, one for each brick in the volume. This will directly communicate with the glusterfsd of each brick.
In the storage server node that contains the brick in need, the request again goes through a series of translators known as server translators, main ones being:
- Protocol server translator
- POSIX translator
The request will finally reach VFS and then will communicate with the underlying native filesystem. The response will retrace the same path.
Stack winding and unwinding[edit | edit source]
Access Mechanisms[edit | edit source]
Native access mechanism being used in GlusterFS is FUSE. But FUSE however come with a small overhead due to context switches and s memory copies made during the data transfer operations. Hence in GlusterFS alternate acces mechanisms are implemented like:
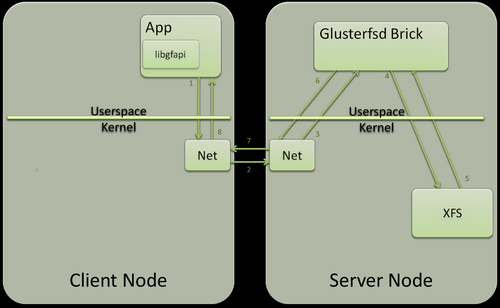
- libgfapi - We access glusterfs via FUSE module. However to perform a single filesystem operation various context switches are required which leads to performance issues. libgfapi is a userspace library for accessing data in Glusterfs. It can perform IO on gluster volumes without the FUSE module, kernel VFS layer and hence requires no context switches. It exposes a filesystem like API for accessing gluster volumes. Samba, NFS-Ganesha, QEMU all use libgfapi to integrate with Glusterfs.
FUSE access. HC image libgfapi access. HC image - GlusterNFS - Using the NFS client, GlusterFS process can interact with the client local storage. For implementing this, the gluster filesystem is mounted as an NFS unit in the client and instead of FUSE translator, an NFS translator exist on top of the client translator stack which acts as a bridge between the NFS module and the rest of the Gluster translators. The advantage of this setup is that it has got the best of both NFS protocol (like sub-directory mount, huge performance hit, etc.) and GlusterFS storage. As of now, it supports NFS version 3.
- GlusterFS and NFS-GANESHA integration - NFS-GANESHA is a user space NFS server instead of as part of the kernel. With NFS-GANESHA, the NFS client talks to the NFS-GANESHA server instead, which is in the user address space already. NFS-GANESHA can access the FUSE filesystems directly through its FSAL without copying any data to or from the kernel, thus potentially improving response times. Of course the network streams themselves (TCP/UDP) will still be handled by the Linux kernel when using NFS-GANESHA. GlusterFS has been integrated with NFS-Ganesha, in the recent past to export the volumes created via glusterfs, using “libgfapi”. By integrating NFS-Ganesha and libgfapi, the speed and latency have been improved compared to FUSE mount access.
- Samba-Gluster- For mounting the GlusterFS volume in a windows environment a SAMBA implimentation exist for GlusterFS. To implement this access mechanism, libgfapi is integrated to the VFS module in Samba. The rest of the tasks are taken care by libgfapi.
Setup,Installation and Configuration[edit | edit source]
Setup[edit | edit source]
Here are some methods to setup environment for deploying glusterfs. Any one of the method can be followed.
Setting up in virtual machines[edit | edit source]
To set up Gluster using virtual machines, it would be better to have least two virtual machines with at least 1GB of RAM each. You may be able to test with less but most users will find it too slow at cases. The particular virtualization product you use is a matter of choice. Platforms that are used to test on include Xen, VMware ESX and Workstation, VirtualBox, and KVM. Here, all the steps assume KVM but the concepts are expected to be simple to translate to other platforms as well. Assuming, you know the particulars of how to create a virtual machine and have installed a 64 bit linux distribution already.
Create or clone two VM’s, with the following setup on each:
- 2 disks using the VirtIO driver, one for the base OS and one that we will use as a Gluster “brick”. You can add more later to try testing some more advanced configurations, but for now let’s keep it simple.
Note: If you have ample space available, consider allocating all the disk space at once.
- 2 NIC’s using VirtIO driver. The second NIC is not strictly required, but can be used to demonstrate setting up a separate network for storage and management traffic.
Note: Attach each NIC to a separate network.
Make sure that if you clone the VM, that Gluster has not already been installed. Gluster generates a UUID to “fingerprint” each system, so cloning a previously deployed system will result in errors later on.
Setting up on physical servers[edit | edit source]
To set up Gluster on physical servers,having two servers of very modest specifications (2 CPU’s, 2GB of RAM, 1GBE) would do good.Make sure you carefully follow the steps since we are dealing with physical servers(hardware).It can be a good idea to deploy your test environment as much as possible the same way you would to a production environment. That being said, here is a reminder of some of the best practices:
- Make sure DNS and NTP are setup, correct, and working
- If you have access to a backend storage network, use it! 10GBE or InfiniBand are great if you have access to them, but even a 1GBE backbone can help you get the most out of your deployment. Make sure that the interfaces you are going to use are also in DNS since we will be using the hostnames when we deploy Gluster.
- When it comes to disks, it would be great if you have more. Although you could technically fake things out with a single disk, there would be performance issues as soon as you tried to do any real work on the servers.
- A lot of users wonder about whether to use RAID on the physical disks or not. The short answer is “yes”.
Once you have setup the servers and installed the OS, you are ready to move on to the install section.
Deploying in AWS[edit | edit source]
Deploying in Amazon can be one of the fastest ways to get up and running with Gluster. Of course, most of what we cover here will work with other cloud platforms.
- Deploy at least two instances. For testing, you can use micro instances. Debates rage on what size instance to use in production, and there is really no correct answer. As with most things, the real answer is “whatever works for you”, where the trade-offs between cost and performance are balanced.
- For cloud platforms, your data is wide open right from the start. As such, you shouldn’t allow open access to all ports in your security groups if you plan to put a single piece of even the least valuable information on the test instances.
- You can use the free “ephemeral” storage for the Gluster bricks during testing, but make sure to use some form of protection against data loss when you move to production. Typically this means EBS backed volumes or using S3 to periodically back up your data bricks.
Other notes[edit | edit source]
- In production, it is recommended to replicate your VM’s across multiple zones.
- Using EBS volumes and Elastic IP’s is also recommended in production. For testing, you can safely ignore these as long as you are aware that the data could be lost at any moment, so make sure your test deployment is just that, testing only.
- Performance can fluctuate wildly in a cloud environment. If performance issues are seen, there are several possible strategies, but keep in mind that this is the perfect place to take advantage of the scale-out capability of Gluster. While it is not true in all cases that deploying more instances will necessarily result in a “faster” cluster, in general you will see that adding more nodes means more performance for the cluster overall.
- If a node reboots, you will typically need to do some extra work to get Gluster running again using the default EC2 configuration. If a node is shut down, it can mean absolute loss of the node (depending on how you set things up).
- Amazon EC2 instances have two IP’s by default, the world facing, DNS resolvable one, and an internal IP on a private IP address. When setting up Gluster for testing, you can use the internal network address to deploy quickly. However, be aware that internal IP’s in AWS can cause failures for Gluster in a few ways, and so are unsuitable in production. For clarity, the IP or hostname you ssh into is the external address, and the 10.x.x.x address you see when you run ifconfig in the instance is the internal one.
Note: There are cases where the internal IP address can change.
Installing as a package[edit | edit source]
For Debian[edit | edit source]
wget -nd -nc -r -A.deb http://download.gluster.org/pub/gluster/glusterfs/3.3/LATEST/Debian
dpkg -i glusterfs_3.3.0-1_amd64.deb
For Ubuntu[edit | edit source]
wget -nd -nc -r -A.deb   http://download.gluster.org/pub/gluster/glusterfs/LATEST/Ubuntu/12.04/glusterfs_3.3.0-1_amd64.deb
dpkg -i glusterfs_3.3.0-1_amd64.deb
For Fedora[edit | edit source]
wget -l 1 -nd -nc -r -A.rpm http://download.gluster.org/pub/gluster/glusterfs/LATEST/Fedora
yum install glusterfs-3.5.3-1.fc16.x86_64.rpm glusterfs-fuse-3.5.3-1.fc16.x86_64.rpm
 glusterfs-geo-replication-3.5.3-1.fc16.x86_64.rpm glusterfs-server-3.5.3-1.fc16.x86_64.rpm
For Redhat/Centos[edit | edit source]
wget -l 1 -nd -nc -r -A.rpm http://download.gluster.org/pub/gluster/glusterfs/LATEST/RHEL/epel-6/x86_64/
yum install glusterfs-3.5.3-1.el6.x86_64.rpm glusterfs-fuse-3.5.3-1.el6.x86_64.rpm
 glusterfs-geo-replication-3.5.3-1.el6.x86_64.rpm glusterfs-server-3.5.3-1.el6.x86_64.rpm
Installing from the source[edit | edit source]
To build and install GlusterFS from the source code
Building[edit | edit source]
There are few packages required for building GlusterFS,
Fedora/CentOS/RHEL[edit | edit source]
The following yum command installs all the build requirements for Fedora,
# yum install automake autoconf libtool flex bison openssl-devel libxml2-devel python-devel libaio-devel libibverbs-devel
 librdmacm-devel readline-devel lvm2-devel glib2-devel
Ubuntu/Debian/Mint[edit | edit source]
The following apt-get command will install all the build requirements on Ubuntu,
$ sudo apt-get install make automake autoconf libtool flex bison pkg-config libssl-dev libxml2-dev python-dev
 libaio-dev libibverbs-dev librdmacm-dev libreadline-dev liblvm2-dev libglib2.0-dev
Installing[edit | edit source]
Proceed with the following steps:
1.Create a new directory using the following commands:
# mkdir glusterfs
# cd glusterfs
2.Download the source code.
You can download the software http://www.gluster.org/download/
3.Extract the source code
4.Run autogen to generate the configure script.
# ./autogen.sh
Once autogen completes successfully a configure script is generated. Run the configure script to generate the makefiles.
# ./configure

GlusterFS configure summary
==================
FUSE client : yes
Infiniband verbs : yes
epoll IO multiplex : yes
argp-standalone : no
fusermount : no
readline : yes
georeplication : yes
The configuration summary shows the components that will be built with GlusterFS.
5.Build the GlusterFS software using the following commands:
# make
# make install
6.Verify that the correct version of GlusterFS is installed, using the following command:
# glusterfs --version
7.Ensure that TCP ports 111, 24007,24008, 24009-(24009 + number of bricks across all volumes) are open on all Gluster servers. If you will be using NFS, open additional ports 38465 to 38467.
You can use the following chains with iptables:
# iptables -A RH-Firewall-1-INPUT -m state --state NEW -m tcp -p tcp --dport 24007:24047 -j ACCEPT
# iptables -A RH-Firewall-1-INPUT -m state --state NEW -m tcp -p tcp --dport 111 -j ACCEPT
# iptables -A RH-Firewall-1-INPUT -m state --state NEW -m udp -p udp --dport 111 -j ACCEPT
# iptables -A RH-Firewall-1-INPUT -m state --state NEW -m tcp -p tcp --dport 38465:38467 -j ACCEPT
# service iptables save
# service iptables restart
Note: You need one open port, starting at 24009 for each brick. This example opens enough ports for 20 storage servers and three bricks.
Running GlusterFS[edit | edit source]
GlusterFS can be only run as root, so the following commands will need to be run as root. If you've installed into the default '/usr/local' prefix, add '/usr/local/sbin' and '/usr/local/bin' to your PATH before running the below commands.
A source install will generally not install any init scripts. So you will need to start glusterd manually. To manually start glusterd just run,
# glusterd
This will start glusterd and fork it into the background as a daemon process. You now run 'gluster' commands and make use of GlusterFS.
Building packages[edit | edit source]
Building RPMs[edit | edit source]
Building RPMs is really simple. On a RPM based system, for eg. Fedora, get the source and do the configuration steps as shown in the 'Building from Source' section. After the configuration step, run the following steps to build RPMs,
# cd extras/LinuxRPM
# make glusterrpms
This will create rpms from the source in 'extras/LinuxRPM'. (Note: You will need to install the rpmbuild requirements including rpmbuild and mock).
Configuration[edit | edit source]
Configuring Firewall[edit | edit source]
For Gluster to communicate within a trusted pool either the firewall must be disabled or the communication must be enabled for the servers.
iptables -I INPUT -p all -s <ip-address> -j ACCEPT
Configuring trusted pool[edit | edit source]
A storage pool is a trusted network of storage servers. When you start the first server, the storage pool consists of that server alone. To add additional storage servers to the storage pool, you can use the probe command from a storage server that is already trusted. Servers in the same trusted storage pool are peers of each other. For servers to be part of a volume they must first become peers.
gluster peer probe <hostname or IP of the other server>
Partition, Format and mount the bricks[edit | edit source]
Assuming the brick is at /dev/sdb
fdisk /dev/sdb and create a single partition
mkfs.xfs -i size=512 /dev/sdb1
The above can also be done using parted command.
Mounting partition as Gluster bricks[edit | edit source]
mkdir -p /export/sdb1 && mount /dev/sdb1 /export/sdb1 && mkdir -p /export/sdb1/brick
Add entry to /etc/fstab
echo "/dev/sdb1 /export/sdb1 xfs defaults 0 0" >> /etc/fstab
Setting up Gluster volume[edit | edit source]
To set a gluster volume
gluster volume create vol1 replica 2 server1:/export/sdb1/brick server2:/export/sdb1/brick
Here the volume vol1 is created and its name is vol1. Next we specify the type of volume to be created. The default type of volume is distribute(check the type of volumes section described above for more details), but here we have specified the volume type to be a replicate volume with replica count 2. This would keep a copy of data on two bricks at any time. Finally we specify the nodes and the bricks on the nodes to be used.
If the volume is successfully created we can check the volume details as follows:
gluster volume info
The result would be:
Volume Name: vol1
Type: Replicate
Volume ID: 8bc3e96b-a1b6-457d-8f7a-a91d1d4dc019
Status: Created
Number of Bricks: 1 x 2 = 2
Transport-type: tcp
Bricks:
Brick1: server1:/export/sdb1/brick
Brick2: server2:/export/sdb1/brick
The status is ‘Created’ which means that the volume has been successfully created but not started yet. Hence any attempt to mount the volume would fail.
Start volume[edit | edit source]
You should start the gluster volume using:
gluster volume start vol1
Mounting the volume[edit | edit source]
After starting the volume we can mount it. We must specify glusterfs as the filesystem.
mount -t glusterfs server1:/vol1 <mount_point>
Type command followed by "help" (Eg:gluster volume help)to get different options available for the particular command.
Extended Attributes[edit | edit source]
Rough draft
File attributes are metadata of a file stored by the filesystem on disk. They are strictly defined by the filesystem and help to monitor the state of data. POSIX gives standard metadata of file such as file ownership, file permissions, file size, filename, directory or file etc. However sometimes these fixed set of file attributes may not be enough. Hence many file systems support a mechanism by which a user can add their own metadata to the files and are known as extended attributes. In Linux many filesystems like xfs, ext2, ext3, ext4 etc support extended attributes. Extended attributes are name value pairs associated with files and directories and are divided into four namespaces. The attribute name is specified as namespace.attribute.
1. User - This attribute namespace stores attributes used by user and any application run by the user. The attributes are protected by the normal Unix user permission settings on the file. Eg: user.checksum.sha256, user.original_author, user.application
2. Trusted - This attribute namespace stores attributes accessed only by kernel and should not be accessed by ordinary processes. Eg: trusted.md5sum.
3. System - This attribute namespace is used by kernel for Access Control List (ACL) and is set by root. Eg: system_posix_acl_access, system.posix_acl_default.
4. Security - This attribute namespace is used by kernel security modules like SELinux. The read and write permissions are determined by the security module. By default all processes have read permission on the extended security attributes. Eg: security.selinux.
GlusterFS also uses extended attributes in replication, distribution, striping etc. In DHT a directory must be present on all bricks and each directory copy will be assigned a hash range stored in its extended attribute - trusted.glusterfs.dht. A directory lookup will return the layout (hash ranges collected from the xattrs) which is stored in a table. This helps us to look for missing hash ranges (possible if the brick is down), overlaps etc.
In AFR the extended attribute - trusted.afr.* where * is the brick name, is used for recording operation failure. Consider two bricks brick0 and brick1 in a volume. A file on brick0 has the xattr trusted.afr.brick1 and a file on brick1 has the xattr trusted.afr.brick0. This is becasue if we store both the state of operation (success or failure) and the operation on the same brick and if that brick goes down, then there would be no way to recover from failure since we loose the state of the operations. Hence the operation and the state of operation are stored at two different places. The xattr works as a counter and records counts for three different kinds of operations data, metadata and entry. To perform an operation there are three stages:
1) Preop - whenever a modification is to be made all the counters will be incremented.
2) Op - here the operation is actually performed.
3) Postop - if the operation was successful then the counters are decremented.
If the operation was successful across all the bricks then all counters would go back to zero. However in our example if the brick0 was down or had crashed before the operation was successfully completed then the counter for brick0 stored on brick1 will remain non-zero which implies that the operation on brick0 was unsuccessful.
Someof the other xattrs are trusted.gfid used to detect duplication in inode numbers. trusted.glusterfs.test stored in the root directory of every brick used for determining if xattrs are supported.
Troubleshooting FAQ[edit | edit source]
1. What ports does Gluster need?
Preferably, your storage environment should be located on a safe segment of your network where firewall is not necessary. In the real world, that simply isn't possible for all environments. If you are willing to accept the potential performance loss of running a firewall, you need to know that Gluster makes use of the following ports:
- 24007 TCP for the Gluster Daemon
- 24008 TCP for Infiniband management (optional unless you are using IB)
- One TCP port for each brick in a volume. So, for example, if you have 4 bricks in a volume, port 24009 – 24012 would be used in GlusterFS 3.3 & below, 49152 - 49155 from GlusterFS 3.4 & later.
- 38465, 38466 and 38467 TCP for the inline Gluster NFS server.
- Additionally, port 111 TCP and UDP (since always) and port 2049 TCP-only (from GlusterFS 3.4 & later) are used for port mapper and should be open.
Note: by default Gluster/NFS does not provide services over UDP, it is TCP only. You would need to enable the nfs.mount-udp option if you want to add UDP support for the MOUNT protocol. That's completely optional and is up to your judgement to use.
2. I am having issues trying to create a trusted pool
Make sure to check the basics first:
- Does nslookup show the expected values for the short, FQDN, and reverse lookup by IP?
- Make sure not to use /etc/hosts! Although there is nothing wrong with this in theory, there is no way to track the countless hours that have been lost troubleshooting things only to find out that one server had an errant entry in /etc/hosts.
- Can you reach port 24007 on the servers (e.g. via telnet)?
- Are you able to issue any other gluster commands successfully? If not, the gluster daemon is most likely not running.
/etc/init.d/glusterd status
glusterd.service - LSB: glusterfs server
    Loaded: loaded (/etc/rc.d/init.d/glusterd)
    Active: inactive (dead)
    CGroup: name=systemd:/system/glusterd.service
3. How can I tell if the gluster daemon running?
Several commands can be used here:
service glusterd status
systemctl status glusterd.service
/etc/init.d/glusterd status
4. I can't mount the volume on the server
Check the gluster volume info output and make sure the volume shows a status of “Started”
gluster volume info
...
Status: Started
...
Make sure you can see the volume by running the command `showmount -e <gluster node>
showmount -e econode01
Export list for econode01:
/communitytest *
5. I can't mount the volume from a client
- Make sure you are able to connect to the machine you are trying to mount the volume from (not just ping it)
- Make sure that glusterd is running on all servers
- Make sure that the volume is started
6. I upgraded Gluster, and now a client seems to be have issues connecting
Check whether the client is using the same version of Gluster when using the native client
glusterfsd --version
glusterfs 3.3.1 built on Oct 11 2012 21:22:46
In many cases, it may be enough to remount the volume
7. Not all of the hosts have the same output when i run “gluster peer probe”
This is generally a good thing, with some caveats -
- The output from each server should show all OTHER servers, but NOT itself
- Each server should have the same UUID, for example, the UUID of server2 should always be the same no matter which server you run gluster peer status from
- The Status should always show “Peer in Cluster (Connected)”
- The value should match what you see in /var/lib/glusterd/glusterd.info for server2
8. I accidentally killed the Gluster daemon while some data was transferring!
All is not lost. In fact, nothing is. Glusterd is used to manage the cluster as a whole, for example, to create new volumes or modify existing ones. If it dies, you will not be able to start or stop volumes, but data will still keep chugging right on through.
9. I accidentally uninstalled Gluster!
You are in luck. Hopefully. If you left your configuration directory in place, just reinstall and everything should come up just as it was before.
1) yum erase glusterfs-server
...
Running Transaction
 Erasing    : glusterfs-server-3.3.1-1.fc17.x86_64
  ...
2) yum install glusterfs-server
...
Installed:
 glusterfs-server.x86_64 0:3.3.1-1.fc17

Complete!

3) service glusterd start

4) gluster volume info

 Volume Name: communitytest
 Type: Replicate
 Volume ID: 5c26bcfe-7db4-40fe-ade4-a2755d53a19d
 Status: Started
 ...
The precending commands show gluster being uninstalled and reinstalled. After the glusterd service is started, all that was left was to run gluster volume info to shoe ther state of the volume is just like we left it.
- If for some reason you DID delete the configuration directory, you can still get things back in no time if you know EXACTLY how the volumes were laid out before. You DID document that, right?
- Ah. You didn't. Well, you are in for a headache, but all is not lost. You can create new volumes and import the data back in with your favorite commands like rsync, tar, mv or even scp (if you are paid by the hour).
10. I can't mount with NFS
- Make sure that the kernel NFS service isn't running on the servers
- Make sure that the rpcbind or portmap service is running
- For newer linux distributions, you can add the option vers=3 like so:
mount -t nfs -o vers=3 server2:/myglustervolume /gluster/mount/point
11. One of the nodes in a replicated pair went down. The issue is resolved, but how can I get my data back in sync?
Check again, it may be already! Gluster has automatic failover and self-heal as two of its' most powerful features
12. I don't have a lot of money, but I love to read...where are the Gluster logs?
/var/log/glusterfs
13. How can I rotate the logs?
gluster volume log rotate myglustervolume
14. Where are the configuration files?
/var/lib/glusterd for newer versions, /etc/glusterd/ for older ones
15. I am getting weird errors and inconsistencies from a database I am running in a Gluster volume
Unless your database does almost nothing, this is expected. Gluster does not support structured data (like databases) due to issues you will likely encounter when you have a high number of transactions being persisted, lots of concurrent connections, etc. Gluster *IS*, however, a perfect place to store your database backups.
16. Gluster is acting strangely, so i restarted the daemon, but the issue is still there.
Halloween is just around the corner as this is being written, so make sure that whatever is supposed to be dead, actually IS, with the command
ps -ax | grep glu
If any gluster processes are still running after you shut down a host, use
killall gluster{,d,fs,fsd}
17. Do I need to run commands on every host?
It depends on the command.
- As mentioned elsewhere in the Getting Started guides, for Gluster CLI commands like `gluster volume create`, you should specify one server only to run the commands from to make troubleshooting simpler.
- For commands like `gluster peer status`, you want to make sure and check each server individually since Gluster, like all clustered systems, needs to have consistent configurations between all servers.
18. Is there any way to check all the nodes quicker?
You can run commands on a remote host using the --remote-host switch
gluster --remote-host=server2 peer status
- If you have CTDB configured, you can use the `onnode` command to specify all hosts at once, or just from one or two individually
- Depending on how safe your environment is, you can use the ssh-keygen and ssh-copy-id commands to login or run commands remotely without needing a password
19. Gluster caused my {network, kernel, filesystem,luxurious alpaca farm} to have issues!!!
Possibly. But, in most cases, Gluster, or any software that taxes your network or storage infrastructure resources, isn't causing the issue...it's simply exposing it. If you do find an issue that you feel is legitimately caused by Gluster, we want to know! Filing a bug, submitting a patch, sending an email to the gluster-users list, or chatting with us in IRC are all great ways to help make Gluster better for everyone.
20. What is a transport endpoint, and why isn't it connected?
If you spend a fair amount of time reading your Gluster logs (and who wouldn't?!), you will regularly see this error message. On the surface, it is fairly generic, and roughly translates as “Gluster isn't communicating for some reason”. Most often, this is caused by saturation of either storage or network resources somewhere in the cluster. One or two instances here and there are expected, if not exactly desired. When should you worry? If you see the message repeated over a sustained period of time, or several times a day the logs flood with it, you probably need to fix that. Using the techniques covered here will work for the vast majority of cases. If not, we have commonly seen issues like:
- RAID or NIC drivers or firmware needed to be updated
- Third-party backup applications were running at the same time
- The /etc/cron.daily/mlocate script was never told to prune the bricks or networked filesystem
- Aggressive use of rsync jobs on the gluster bricks or mount points
21.Error:Errno 107
This means that there are network issues so check if any of the following scenarios exist and try again after rebooting the system:
- Firewall is not disabled.
- SELINUX is not set to disable.
- IP Addresses are not added to the Iptables of the respective servers.
22.Error:gluster is not operational
For this sort of error restart the system and accordingly the gluster daemon / service with the command:
sudo reboot
service gluster start
gluster peer status
Then do the peer probing:
gluster peer probe ipaddress/hostname
Check the peer status whenever you add a peer or when you create a new volume.
23.Accepted peer request - disconnected
It is the same error as errno 107. Refer no. 21.
24. GlusterFS Geo-replication did not synchronize the data completely but still the geo-replication status display OK.
You can enforce a full sync of the data by erasing the index and restarting GlusterFS Geo-replication. After restarting, GlusterFS Geo-replication begins synchronizing all the data, that is, all files will be compared with by means of being checksummed, which can be a lengthy /resource high utilization operation, mainly on large data sets (however, actual data loss will not occur).
25. Gluster mount fails when provided in CONFIG_CINDER_GLUSTER_MOUNTS during packstack installation.
This generally means that the Gluster server/volume couldn't be reached for some reason. There should be a log file in /var/log/gluster corresponding to that mount point that will give a more precise reason for the failure.
26.Mount command on NFS client fails with “RPC Error: Program not registered
Start portmap or rpcbind service on the NFS server.
This error is encountered when the server has not started correctly.
On most Linux distributions this is fixed by starting portmap:
$ /etc/init.d/portmap start
On some distributions where portmap has been replaced by rpcbind, the following command is required:
$ /etc/init.d/rpcbind start
After starting portmap or rpcbind, gluster NFS server needs to be restarted.
27.NFS server start-up fails with “Port is already in use” error in the log file.
Another Gluster NFS server is running on the same machine.
This error can arise in case there is already a Gluster NFS server running on the same machine. This situation can be confirmed from the log file, if the following error lines exist:
[2010-05-26 23:40:49] E [rpc-socket.c:126:rpcsvc_socket_listen] rpc-socket: binding socket failed: Address already in use
[2010-05-26 23:40:49] E [rpc-socket.c:129:rpcsvc_socket_listen] rpc-socket: Port is already in use
[2010-05-26 23:40:49] E [rpcsvc.c:2636:rpcsvc_stage_program_register] rpc-service: could not create listening connection
[2010-05-26 23:40:49] E [rpcsvc.c:2675:rpcsvc_program_register] rpc-service: stage registration of program failed
[2010-05-26 23:40:49] E [rpcsvc.c:2695:rpcsvc_program_register] rpc-service:Program registration failed:MOUNT3,Num:100005,Ver:3,Port:38465
[2010-05-26 23:40:49] E [nfs.c:125:nfs_init_versions] nfs: Program init failed
[2010-05-26 23:40:49] C [nfs.c:531:notify] nfs: Failed to initialize protocols
To resolve this error one of the Gluster NFS servers will have to be shutdown. At this time, Gluster NFS server does not support running multiple NFS servers on the same machine.
28.Mount command fails with “rpc.statd” related error message
If the mount command fails with the following error message:
mount.nfs: rpc.statd is not running but is required for remote locking.
mount.nfs: Either use '-o nolock' to keep locks local, or start statd.
Start rpc.statd For NFS clients to mount the NFS server, rpc.statd service must be running on the clients. Start rpc.statd service by running the following command:
$ rpc.statd
29.Mount command takes too long to finish.
Start rpcbind service on the NFS client.
The problem is that the rpcbind or portmap service is not running on the NFS client. The resolution for this is to start either of these services by:
$ /etc/init.d/portmap start<
On some distributions where portmap has been replaced by rpcbind, the following command is required:
$ /etc/init.d/rpcbind start
30.Showmount fails with clnt_create: RPC: Unable to receive
Check your firewall setting to open ports 111 for portmap requests/replies and Gluster NFS server requests/replies. Gluster NFS server operates over the following port numbers: 38465, 38466, and 38467.
31.How to get the log-file(master and slave) for geo-replication?
gluster volume geo-replication config log-file
For example:
# gluster volume geo-replication Volume1 example.com:/data/remote_dir config log-fil
To get the log file for Geo-replication on slave (glusterd must be running on slave machine), use the following commands:
On master, run the following command:
# gluster volume geo-replication Volume1 example.com:/data/remote_dir config session-owner 5f6e5200-756f-11e0-a1f0-0800200c9a66
Displays the session owner details.
On slave, run the following command:
# gluster volume geo-replication /data/remote_dir config log-file /var/log/gluster/${session-owner}:remote-mirror.log
Replace the session owner details (output of Step 1) to the output of the Step 2 to get the location of the log file.
/var/log/gluster/5f6e5200-756f-11e0-a1f0-0800200c9a66:remote-mirror.log
